
You have been Successfully Subscribed to Newsletter


How a Car Defogger Works and Its Benefits
June 03, 2026 • 10 Min Read
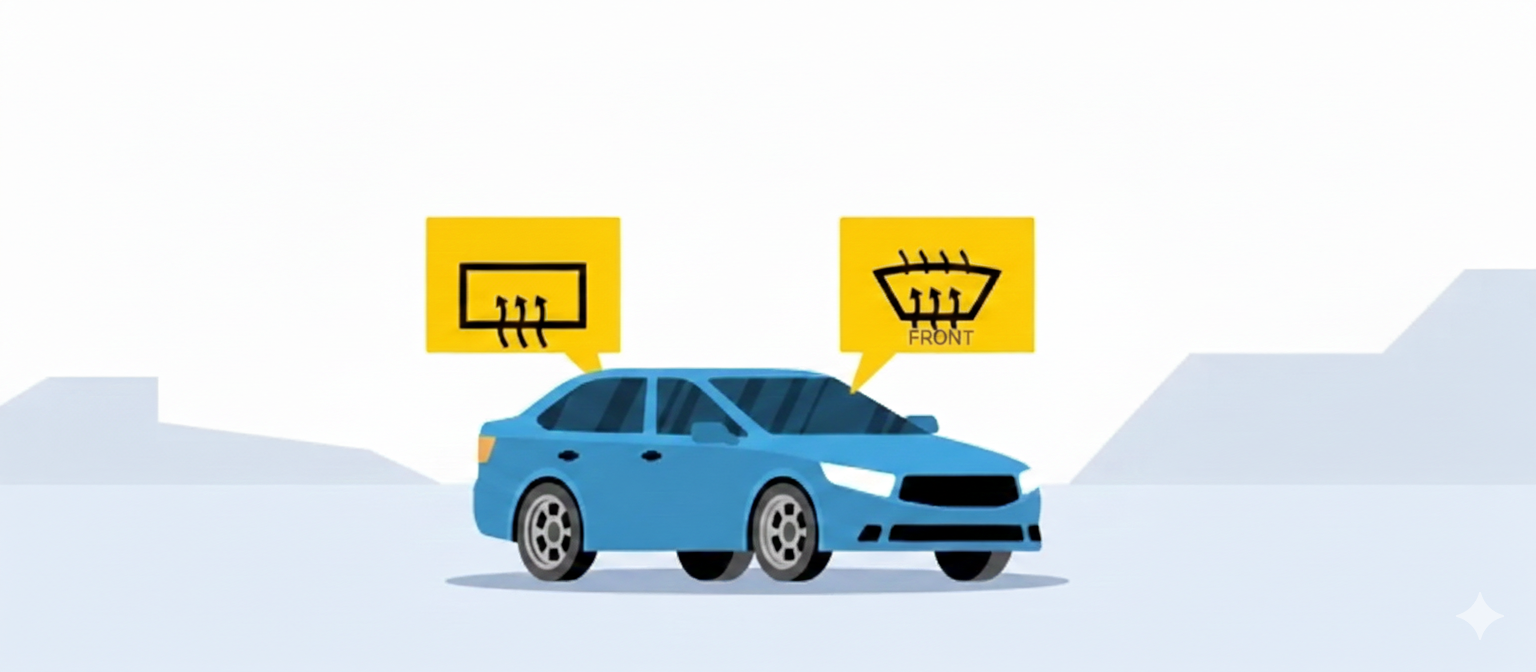
Foggy car windows can turn a routine drive into a dangerous situation. When moisture builds up on your windshield and rear window, visibility drops to dangerous levels, making it difficult to see other vehicles, pedestrians, or road hazards clearly.
Understanding defogger in car systems and their proper usage helps you maintain clear vision during monsoons, winter mornings, and humid conditions. This guide explains how these essential safety features work and why every driver should know how to use defogger in car effectively.
What is a Defogger for Car?
A car defogger removes condensation and fog from windows by managing temperature differences between your car's interior and exterior surfaces. These systems prevent severe visibility issues that contribute to road accidents, especially during India's varied weather conditions.
Definition and Importance
A defogger for car is a mechanism designed to clear moisture from window surfaces using either heated air circulation or electrical heating elements. When warm, humid air inside your vehicle meets cold window glass, condensation forms and blocks your view.
The science behind fogging is straightforward. Temperature differences create condensation when warm air contacts cold surfaces. During monsoons or cold mornings, this natural process can reduce visibility to alarming levels. Studies show that poor visibility conditions contribute to increased road accidents, making defoggers critical safety features rather than mere convenience items.
Modern defoggers work as guardians of driver visibility. They ensure clear visibility through all windows, preventing accidents caused by impaired vision. The importance of these systems becomes clear when considering that reduced visibility increases accident risks in challenging weather conditions.
History and Evolution
The rear window defroster was invented by German automobile engineer Heinz Kunert, revolutionising automotive safety. The first car equipped with this technology was the 1935 Lincoln, marking the beginning of systematic fog prevention in vehicles.
From the 1950s onwards, vehicles started including rear defoggers as standard equipment to make driving safer and more comfortable. This early adoption in luxury vehicles gradually spread to mass-market cars, becoming common in most vehicles by the early 2000s.
The technology evolved from simple heating elements to sophisticated systems integrated with modern HVAC controls. Today's defoggers include automatic sensors that detect humidity levels and activate the system when necessary, making them more efficient and user-friendly than their predecessors.
Types of Car Defoggers
Car defoggers come in three main types; each designed for specific window areas and using different technologies to clear condensation effectively.
Front Defogger: Operation and Use
The front defogger integrates with your car's HVAC system to clear the windshield using heated, dehumidified air. When activated, the system draws fresh air from outside, removes moisture, and heats it before directing the airflow towards the windshield. This system proves more effective than recirculated cabin air because fresh outside air contains less moisture than the humid air trapped inside your vehicle.
Rear Defogger: Electric Heating Elements
Rear defoggers use thin electrical heating wires embedded directly in the rear windshield glass. These nearly invisible heating elements generate warmth when electricity flows through them, gradually clearing fog and condensation.
The system consists of:
|
|
|
|---|---|
| Heating wires | Generate heat to clear condensation |
| Electrical connections | Heat up a grid of lines on the rear window |
| Control switch | Detects the outside temperature and determines the operation time of the RR defogger |
| Timer mechanism | Automatically turns on and off with the press of the timer switch |
Most rear defoggers operate on a timer system, running for 10-15 minutes before automatically shutting off to prevent battery drain and overheating.
Side Mirror Defogger and Additional Features
Side mirror defoggers prevent moisture from affecting your side mirrors, which are essential for safe lane changes and reversing. These systems typically connect to the rear defogger circuit and activate simultaneously.
Modern vehicles include advanced defogger features such as:
- Automatic humidity sensors that detect moisture levels
- Temperature-based activation for optimal timing
- Integration with climate control for coordinated operation
These features make defogger systems more efficient, reducing the need for manual operation.
How to Use a Car Defogger Effectively
Proper defogger operation requires understanding when and how to activate different systems for maximum effectiveness and safety.
Using the Front Defogger

To activate your front defogger, look for the button with a windshield symbol containing wavy lines or straight lines. This symbol appears on most vehicle dashboards near other climate controls.
Step-by-step activation process:
- Press the defogger button to activate the system.
- Turn off air recirculation to allow fresh air to enter.
- Increase fan speed to accelerate the defogging process.
- Adjust the temperature to warm for faster results.
The fresh air mode proves crucial because it introduces dry outside air rather than recirculating humid cabin air. Higher fan speeds move more air across the windshield surface, accelerating moisture removal.
Activating the Rear Defogger
Find the rear defogger button, typically marked with a rectangle containing horizontal lines or wavy lines.
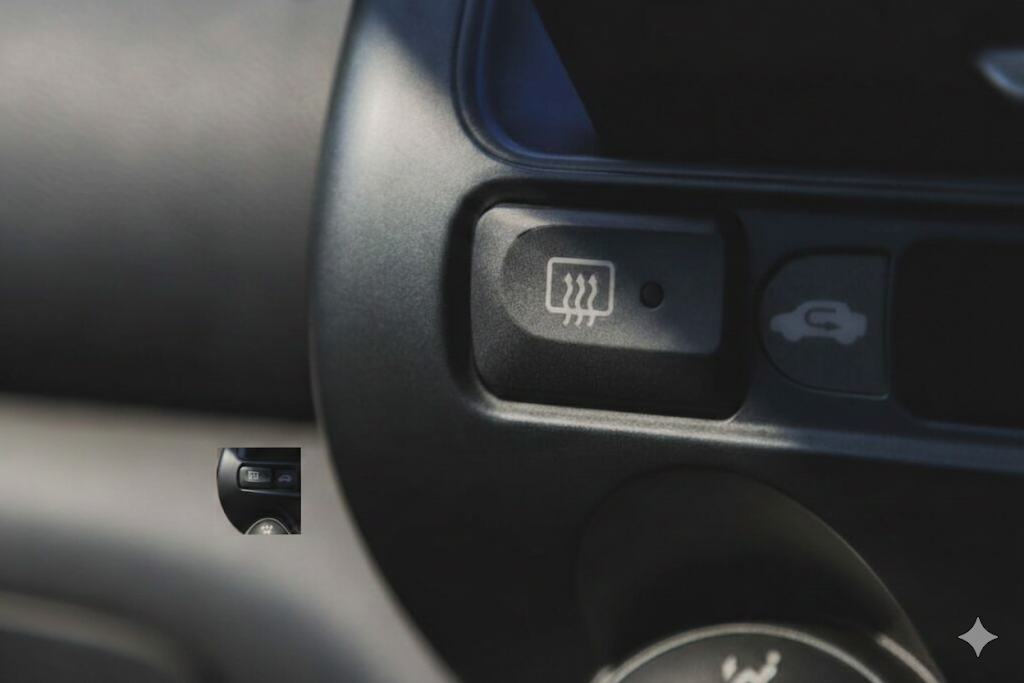
This button usually sits near the front defogger controls on your dashboard.
Activation steps:
- Locate the button with the proper symbol.
- Press once to activate the heating elements.
- Wait 3-5 minutes for the system to work effectively.
- Monitor progress through your rearview mirror.
The defogger typically takes several minutes to clear condensation completely, depending on the fog severity and outside temperature conditions.
Check out the table below to know some of the popular Indian car models equipped with rear defogger button.
|
|
|
|---|---|
| Tata Punch | 5.60–10.55 lakh |
| Tata Sierra | 11.49–21.29 lakh |
| Hyundai Venue | 8.00–15.69 lakh |
| Mahindra Thar | 9.99–16.99 lakh |
| Kia Seltos | 10.99–19.99 lakh |
| Maruti Swift | 5.79–8.80 lakh |
| Maruti FRONX | 6.95–11.98 lakh |
Disclaimer: These are ex-showroom prices for cars to be delivered in Delhi. The on-road price will have additional costs of registration, RTO, accessories, etc. Also, the price structure can vary based on the location. So, check with your manufacturer or dealer for the exact price.
Side Mirror Defogger Usage
Side mirror defoggers often link directly to the rear defogger system and activate automatically when you press the rear defogger button. Some vehicles provide separate controls for mirror heating.
Tips for Faster Defogging
Understanding how to use a defogger in cars effectively can help significantly reduce clearing time and improve safety.
Quick defogging strategies:
- Manage cabin temperature to reduce temperature differences.
- Use fresh air mode instead of recirculation.
- Increase fan speed to improve air circulation.
- Clean windows regularly to prevent moisture buildup.
- Remove wet items from the cabin after rain.
Prevention works better than correction. Keeping your cabin temperature closer to the outside temperature reduces condensation formation.
Common Problems and Maintenance
Regular maintenance keeps your defogger systems working effectively when you need them most. Understanding common issues helps you identify problems early.
Checking Fuses and Electrical Connections
Rear defoggers draw significant power, making blown fuses a common problem during winter. If your front defogger works but the rear doesn't, check the fuse box first.
Troubleshooting steps:
- Locate the fuse box (usually under the dashboard or hood)
- Find the rear defogger fuse using your owner's manual
- Inspect the fuse for breaks or burns
- Replace, if necessary, with the correct amperage rating
Loose or corroded connections also cause defogger failures. Check connection points for signs of corrosion or damage.
Inspecting Heating Elements
Damaged heating wires in the rear window create uneven defogging patterns. You'll notice bands of fog that don't clear when the defogger operates.
Visual inspection process:
- Look for breaks in the thin wire grid.
- Check for scratches or cuts across the lines.
- Test functionality by observing clearing patterns.
- Note any gaps where fog remains.
Broken gridlines cannot conduct electricity properly, leading to incomplete defogging of affected areas.
Cleaning and Vent Maintenance
Blocked vents reduce airflow and defogger effectiveness. Regular cleaning ensures optimal performance from your front defogger system.
Maintenance checklist:
|
|
|
|
|---|---|---|
| Clean dashboard vents | Monthly | Better airflow |
| Wipe window surfaces | Weekly | Improves visibility |
| Check air filter | Every 6 months | Helps maintain optimal engine performance |
Dirty windshields provide more surface area for moisture to cling to, making defogging less effective.
When to Seek Professional Help
Complex electrical issues require professional diagnosis and repair. Attempting DIY repairs on heating elements or electrical systems can damage expensive components.
Professional repair situations:
- Broken heating wires in the rear window
- Electrical system failures affecting multiple components
- HVAC system problems impacting front defogger operation
- Sensor malfunctions in automatic systems
Safety considerations make professional repair the preferred option for most defogger problems.
Preventing Fog in Car Windows
Prevention strategies reduce the need for defogger use and improve overall comfort during your drives.
Practical Prevention Measures
Managing moisture sources and air circulation prevents fog formation before it becomes a visibility problem.
Effective prevention methods:
- Remove wet floor mats and clothing after rain
- Keep windows slightly open for air circulation
- Use fresh air mode regularly to reduce humidity
- Dry interior surfaces if leaks occur
- Park in covered areas when possible
Temperature management plays a crucial role in prevention. Keeping the interior temperature closer to the outside temperature reduces condensation potential.
DIY Solutions: Silica Gel and Shaving Cream
Simple household items can help prevent window fogging through moisture absorption and surface treatment.
Silica gel method
Place silica gel packets in a
sock and position them in your car overnight. These hygroscopic materials absorb
moisture from cabin air, reducing humidity levels.
Shaving cream technique
Apply a thin layer of shaving cream to clean, dry windows, then wipe it with a dry towel. This creates an invisible barrier that repels moisture particles.
Both methods provide temporary solutions but require regular reapplication for continued effectiveness.
Maintaining Clean Windows and Interior
Clean surfaces resist fog formation better than dirty ones. Regular cleaning removes residue that provides condensation nucleation sites.
Cleaning routine:
- Interior windows: Weekly cleaning with appropriate glass cleaner
- Cabin surfaces: Regular vacuuming and wiping
- Air vents: Monthly cleaning to ensure proper airflow
- Floor mats: Regular washing and drying
Consistency in cleaning schedules prevents moisture-attracting residue buildup.
Portable Defoggers and Aftermarket Devices
Portable defoggers offer additional defogging power for vehicles without built-in systems or as backup options.
Overview of Plug-in Defoggers
Plug-in defoggers connect to your vehicle's 12V outlet and provide rapid heating for windshield clearing. These devices heat up quickly and include adjustable brackets for proper positioning.
Key features:
- Adjustable mounting: 180-degree bracket adjustment
- Ergonomic design: Hand-held operation capability
- Safety features: Built-in fuses and automatic shut-off
These devices prove particularly useful for older vehicles lacking effective defogger systems.
Pros and Cons Compared to Built-in Systems
Portable defoggers offer flexibility but cannot match the convenience and effectiveness of integrated systems.
|
|
|
|
|---|---|---|
| Installation | Plug and play | Factory integrated |
| Effectiveness | Limited coverage | Full window coverage |
| Convenience | Manual operation | Automatic operation |
| Cost | ₹1100–₹2,200 (Approx.) | Included with vehicle |
| Maintenance | Minimal | Regular service needed |
Disclaimer - Prices are indicative and subject to change. Please verify with the manufacturer/dealer.
Safety and Usage Guidelines
Portable defoggers require careful operation to prevent overheating and ensure safe use.
Safety precautions:
- Limit continuous use to 10 minutes maximum
- Allow cooling time between uses
- Avoid touching hot surfaces immediately after use
- Check power draw to prevent battery drain
- Store safely when not in use
Built-in safety features like automatic fuses provide protection against electrical hazards.
Defogger Costs and When to Replace
Understanding repair costs and replacement indicators helps you make informed decisions about defogger maintenance.
Signs Your Defogger Needs Repair
Defogger problems usually show clear visual signs that indicate the need for professional attention.
Warning signs:
- Uneven clearing patterns on the rear window
- Complete system failure with no heating
- Electrical issues affecting dashboard controls
- Visible wire damage in the heating grid
- Slow or ineffective fog clearing
Spotting problems early prevents complete system failure and maintains safety.
Typical Replacement Costs
Replacement costs vary significantly based on vehicle type and defogger complexity.
Cost breakdown by vehicle category:
|
|
|
|
|
|
|---|---|---|---|---|
| Entry-level (WagonR) | 4658 | 5,175 | 867 | Fog Light - 1,100 Rear Taillight - 2,005 Front Headlight - 3,408 |
| Mid-range Hyundai Verna | ₹8,280 | ₹5,952 | 1058 | Fog Light - 1,300 Rear Taillight - 3,320 Front Headlight - 4,900 |
| Premium Mercedes-C Class | 47,911 | 45,653 | 11,400 | Fog Light - 11,340 Rear Taillight - 22,900 Front Headlight - 65,900 |
Disclaimer - Prices are indicative and subject to change. Please verify with the manufacturer/dealer when purchasing. The prices shown above for cars are for their petrol engine variants. For other variants, the prices will differ.
DIY vs Professional Repairs
Most defogger repairs require professional expertise due to the delicate nature of heating elements and electrical systems.
Professional repair advantages:
- Proper equipment for precise installation
- Warranty coverage on replacement parts
- Technical expertise for complex electrical work
- Quick completion within six hours
Attempting DIY repairs on heating elements often results in complete windshield replacement, making professional service more cost-effective.
Protect Your Vehicle with Royal Sundaram Car Insurance
While defoggers protect your visibility, comprehensive car insurance protects your entire vehicle investment. Royal Sundaram offers customisable car insurance coverage with benefits designed for Indian driving conditions.
Royal Sundaram advantages:
- High claim settlement ratio
- 8,000+ cashless garages across India for convenient repairs
- Comprehensive coverage, including own damage and third-party protection
- 15+ add ons to choose from
Frequently Asked Questions (FAQs)
Front defoggers use the HVAC system to blow warm, dry air onto the windshield to evaporate moisture. Rear defoggers use thin electric heating elements embedded in the glass to clear fog and frost.
Yes, defoggers are designed to be used while driving and help maintain clear visibility. Using them on the move is safe and recommended in foggy conditions.
Common reasons include blown fuses, damaged rear heating lines, blocked vents, or HVAC system faults. If basic checks don’t help, a professional inspection is advisable.
Most defoggers clear fog within a few minutes, depending on outside temperature and humidity. Rear defoggers often run on automatic timers of about 10–15 minutes.
Using the A/C helps remove moisture from the air, making defogging faster and more effective. This is especially useful for clearing the front windshield.
Portable plug-in defoggers can provide quick localised warming but are less powerful than built-in systems. They should be used carefully to avoid safety or electrical issues.
Keep the interior dry by removing moisture sources and cleaning windows regularly. You can also use silica gel packets or simple anti-fog methods like shaving cream.
During driving, the battery drain is minimal because the alternator supplies power. Prolonged use with the engine off, however, can drain the battery.
Regularly inspect wiring and heating lines and keep vents clean and unobstructed. Address faults early to prevent bigger electrical or HVAC issues.


Discover the perfect insurance plan for you!
Get your free quote now!
Get StartedBy Clicking on Get Started, You agree to our Terms and Conditions and override DNC/NDNC registration.
More like this
View more


.png)